Rengöring av ZnSe linser

Följ dessa instruktioner från II-VI Infrared, för en helt säker rengöring av era linser.
​​​​​​​OBS! Hela instruktionen är på engelska.

Step 1 - Mild Cleaning for Light Contamination (dust, lint particles)
Use an air bulb to blow off any loose contaminants from the optic surface before proceeding to the cleaning steps. If this step does not remove the contamination, continue to Step 2.

Note: Avoid using shop air lines because they usually contain significant amounts of oil and water. These contaminants can form detrimental absorbing films on optical surfaces. 

(No additional steps necessary for mounted optics.)
Step 2 - Mild Cleaning for Light Contamination (smudges, fingerprints)
Dampen an unused cotton swab or a cotton ball with acetone or isopropyl alcohol. Gently wipe the surface with the damp cotton. Do not rub hard. Drag the cotton across the surface just fast enough so that the liquid evaporates right behind the cotton. This should leave no streaks. If this step does not remove the contamination, continue to Step 3.
 Note: Use only paper-bodied 100% cotton swabs and high-quality surgical cotton balls.
Reagent grade acetone and isopropyl alcohol are recommended. 
(No additional steps necessary for mounted optics.)
Step 2 (alternative method) “Drop and Drag“ - Mild Cleaning for Light Contamination
(Note: The “Drop and Drag” method is not a preferred cleaning method of II-VI Infrared.)
Lay the lens tissue on the optic’s surface. Using an eyedropper, squeeze a few drops of acetone onto the lens tissue, wetting the complete optic’s diameter.
Without lifting the lens tissue, drag the lens tissue across the optic just fast enough so that the liquid evaporates behind the tissue. This should leave no streaks. If this step does not remove the contamination, continue to Step 3.
Note: Use only the lens tissue supplied in the optics cleaning kit or another high-quality lens tissue.
(This method cannot be used for mounted optics.)
Step 3 - Moderate Cleaning for Moderate Contamination (spittle, oils)
Dampen an unused cotton swab or cotton ball with white distilled vinegar. Using light pressure, wipe the optic’s surface with the damp cotton. Wipe excess distilled vinegar with a clean dry cotton swab. Immediately dampen a cotton swab or cotton ball with acetone. Gently wipe the optic’s surface to remove any acetic acid. If this step does not remove the contamination, continue to Step 4.
Note: Use only paper-bodied 100% cotton swabs.
Use only high-quality surgical cotton balls that have been sorted to remove any with embedded abrasives.
White distilled vinegar with a 6% acetic acid content should be used.
(No additional steps necessary for mounted optics.)
Step 4 - Aggressive Cleaning for Severely Contaminated Optics (splatter)
Caution: Step 4 should NEVER be performed on new or unused laser optics. These steps are to be done only on optics that have become severely contaminated from use and have no acceptable results yielded from Steps 2 or 3 as previously noted.
If the thin-film coating is removed, the optic’s performance will be destroyed. A change in apparent color indicates the removal of the thin-film coating.
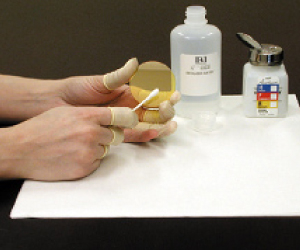
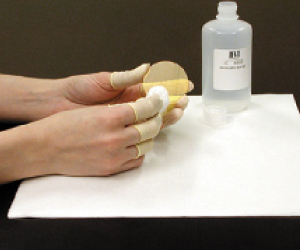
For severely contaminated and dirty optics, an optical polishing compound may need to be used to remove the absorbing contamination film from the optic.
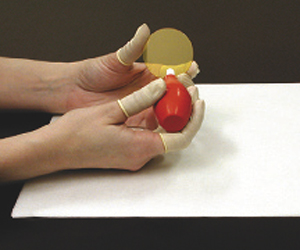
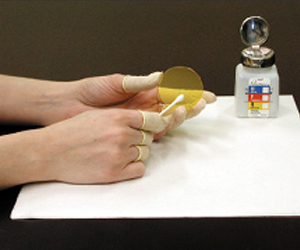
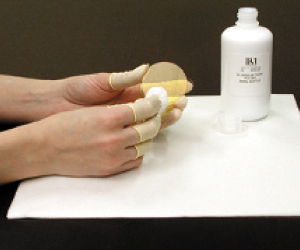
A.Shake the container of polish thoroughly before opening. Pour four or five drops of polish onto a cotton ball. Gently move the cotton ball in circular patterns across the surface to be cleaned. Do not press down on the cotton ball! Let the cotton ball drag lightly across the surface under its own weight. If too much pressure is applied, the polish will quickly scratch the optic’s surface. Rotate the optic frequently to avoid excessive polishing in any one direction. Clean the optic in this manner for no more than 30 seconds. If, at any time during this step, you notice the optic’s surface change color, stop polishing immediately. This color change indicates that the outer portion of the thin-film coating is being eroded.
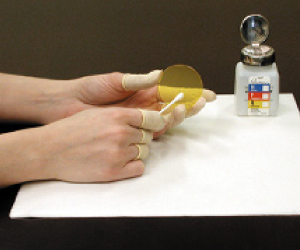
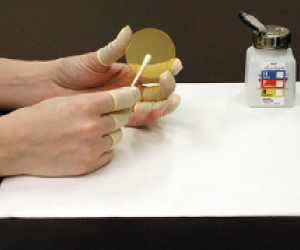
(For a mounted optic, a fluffed cotton swab may have to be substituted for the cotton ball if the entire optic’s surface is to be uniformly cleaned. This is especially true with small diameter optics. Be careful not to apply pressure when using a cotton swab!
For a fluffed cotton swab, take the unused cotton swab and rub it back and forth on a soft piece of foam that is free of foreign particles.)
Step 4 (continued)
B. After using the polish, wet an unused cotton ball with distilled water and gently swab the optic’s surface. Thoroughly wet the surface to remove as much of the polish residue as possible. Do not let the optic’s surface dry! This will make the remaining polish removal much more difficult.
(For a mounted optic, a fluffed cotton swab may be substituted. Try to remove as much polish residue as possible, especially near the mount’s edges.)
Step 4 (continued)
C. Quickly wet a fluffed cotton swab with isopropyl alcohol and gently clean the optic surface thoroughly. Cover the entire surface with the swab to dislodge as much polish residue as possible.
NOTE:If the optic is 2.00” or larger, a cotton ball may be substituted for the cotton swab in this step.
(For a mounted optic, place the cotton swab in the optic’s center and clean outwards in a spiral motion toward the optic’s edges.)
Step 4 (continued)
D. Wet a fluffed cotton swab with acetone and clean the optic’s surface, removing any remaining isopropyl alcohol and polish residue in the process. When performing the final cleaning with acetone, lightly drag the cotton swab across the optic, overlapping strokes until the entire surface has been wiped. Move the swab very slowly for the final strokes to assure that the acetone on the optic’s surface dries immediately behind the swab. This will eliminate streaks on the surface.
(For a mounted optic, start in the optic’s center and work outward in a spiral pattern toward the edge with a fluffed swab dampened with acetone. Use a new cotton swab dampened with acetone and run it around the outside of the optic against the mount to remove the polish residue. Repeat this step several times if necessary to assure that no polish residue is left on the optic’s edges when the cotton swab is lifted from the surface.)

(For a mounted optic, it may be impossible to remove every trace of residue from the surface, especially near the outer edge. Try to be certain any remaining residue is along the optic’s outermost edge only, and not in the center.)

Conclusion
The final step is to carefully examine the optic’s surface under good light in front of a black background. Any visible polish residue should be removed by repeating steps 4B-4D as many times as required.

NOTE
Contamination and damage types, such as metal splatter, pits, etc, cannot be removed. If the optic shows the contamination or damage mentioned, it will probably need to be replaced.
Step 4 (continued)
D. Wet a fluffed cotton swab with acetone and clean the optic’s surface, removing any remaining isopropyl alcohol and polish residue in the process. When performing the final cleaning with acetone, lightly drag the cotton swab across the optic, overlapping strokes until the entire surface has been wiped. Move the swab very slowly for the final strokes to assure that the acetone on the optic’s surface dries immediately behind the swab. This will eliminate streaks on the surface.
(For a mounted optic, start in the optic’s center and work outward in a spiral pattern toward the edge with a fluffed swab dampened with acetone. Use a new cotton swab dampened with acetone and run it around the outside of the optic against the mount to remove the polish residue. Repeat this step several times if necessary to assure that no polish residue is left on the optic’s edges when the cotton swab is lifted from the surface.)

(For a mounted optic, it may be impossible to remove every trace of residue from the surface, especially near the outer edge. Try to be certain any remaining residue is along the optic’s outermost edge only, and not in the center.) col 2 (mobil col)